Data Axle Salesgenie for Salesforce – Install and Configuration
Table of Contents
Introduction
Install the Salesgenie Package
Disable Visibility for Deprecated Lightning/Classic Apps
Assign Permission Sets
Run the Salesgenie Setup App
Supplementary Configuration
Map Lead Fields for Lead Conversion
Duplicate Management Sample
Introduction
The purpose of this documentation is to take you through the installation and configuration of the Salesgenie Prospector app for Salesforce. Once you install the Salesgenie Prospector package, you will need to assign Permission Sets, run the Salesgenie Setup app, and edit page layouts. Since you may use custom fields in the Field Mapping sections of the Salesgenie Setup app, we will show how to create custom fields and how to Map Lead Fields for Lead conversion so that data on your custom Lead fields is carried over to the Contact record on Lead conversion. Next, there is a Duplicate Management sample showing you ways inside of Salesforce to prevent duplicate Salesforce records.
Install the Salesgenie Package
To install the Data Axle Salesgenie for Salesforce App, you will need to have the package URL provided to you by Data Axle. Follow the steps in this section to install the package into your Salesforce org. The other means of installation is through the Salesforce AppExchange.
Click on link from App Source or copy and paste the package link into your browser
Enter your credentials to login to your Salesforce org
-
Select “Install for All Users” > Click Install
If Admin will be pulling leads, select Install for Admins Only.
If Admin will be pulling leads, select to Install for Admins Only.
Check “Yes, grant access to these third-party web sites” > Click Continue
Click Done when installation is complete
Disable Visibility for Deprecated Lightning/Classic Apps
The Salesgenie app for Salesforce was rebranded and new apps with updated branding, names, and description were created. To reduce confusion, removing visibility for the deprecated apps is recommended.
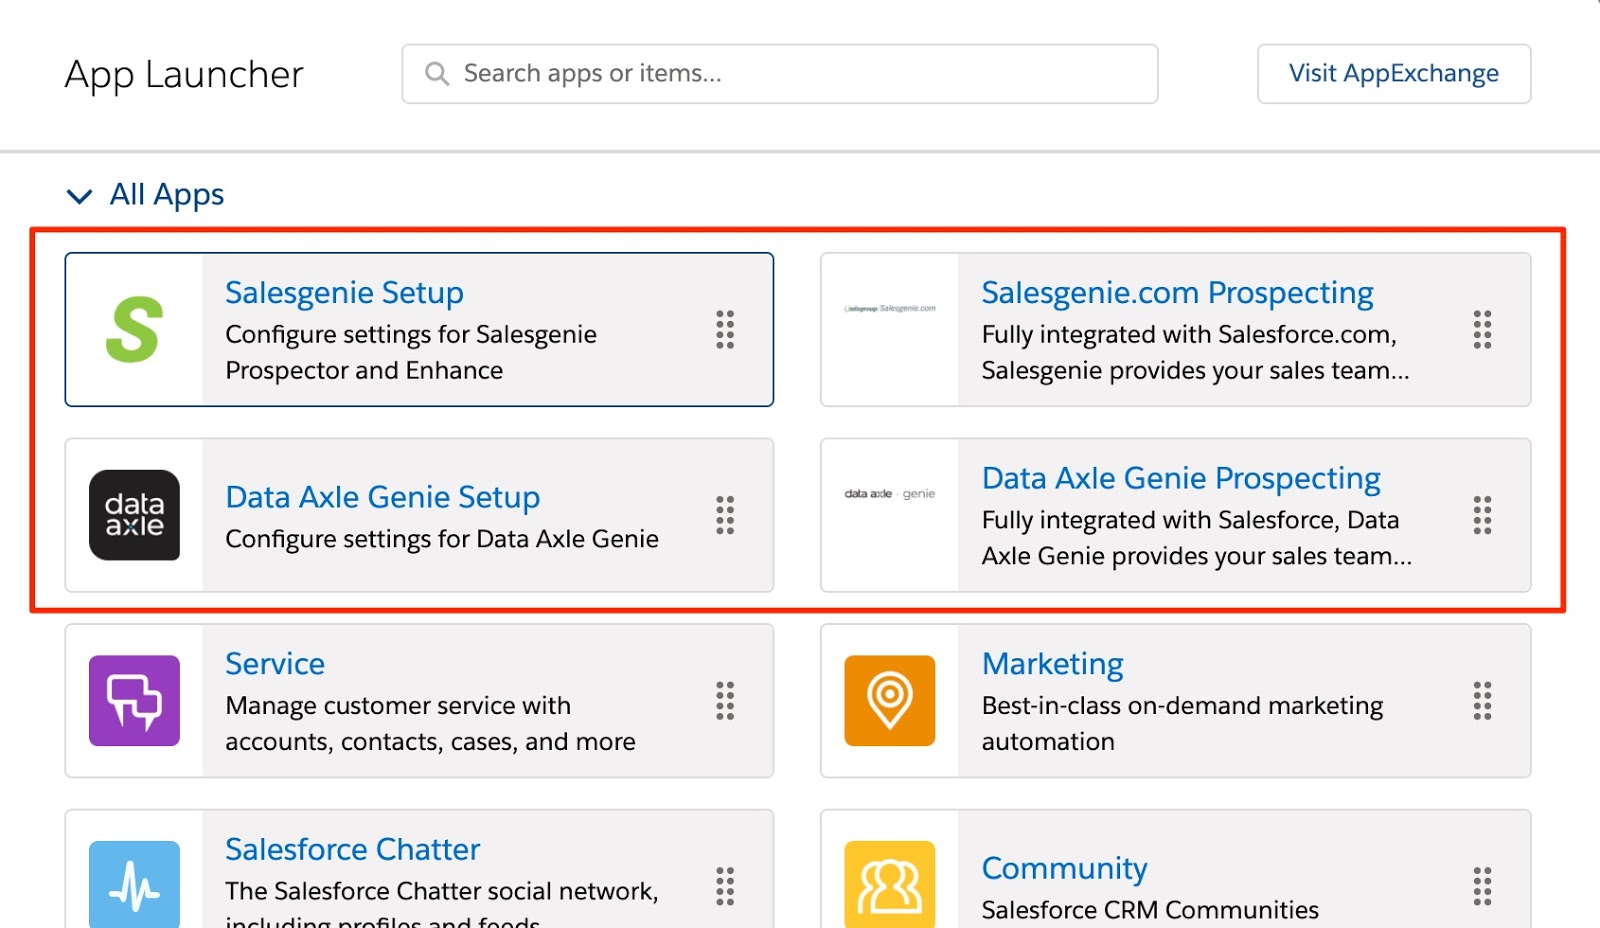
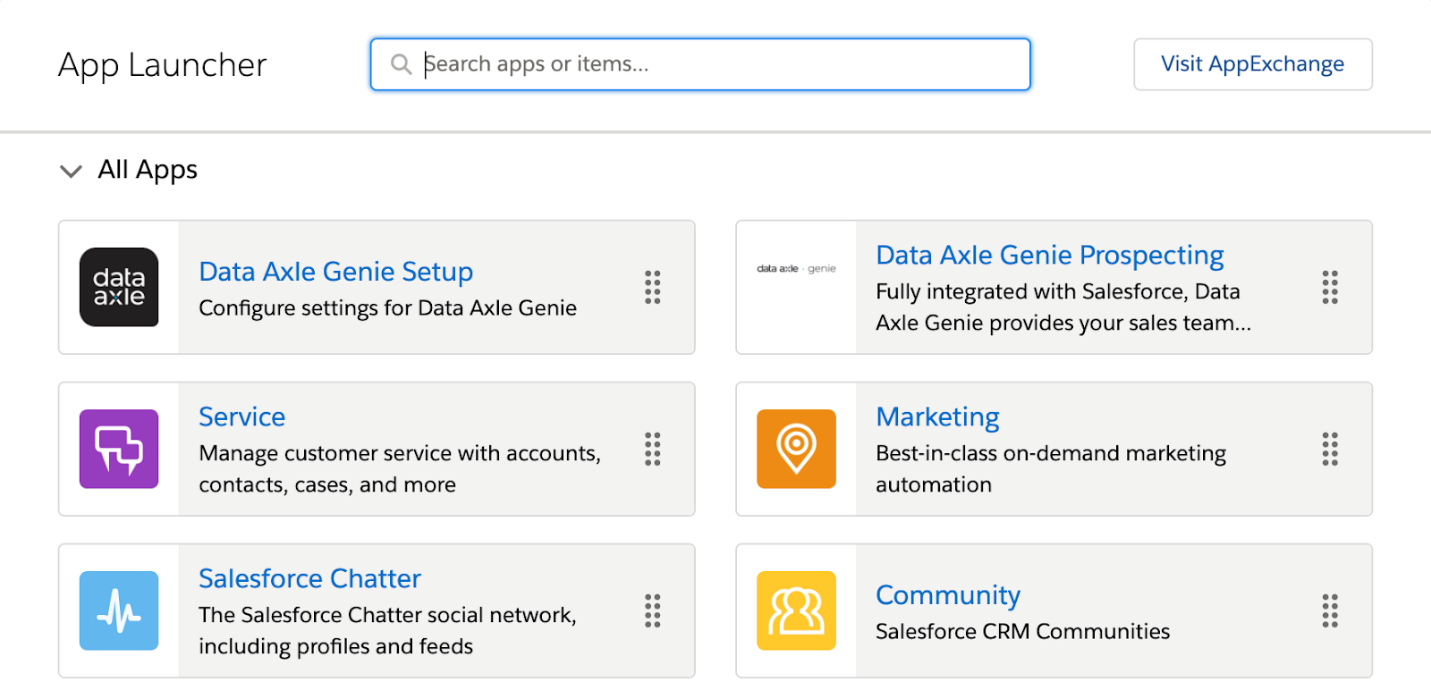
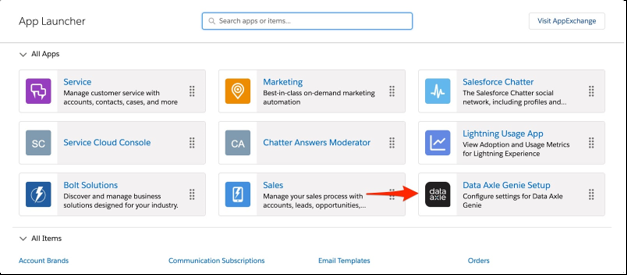
This is what the Lightning App Launcher will look like after the initial install/upgrade:
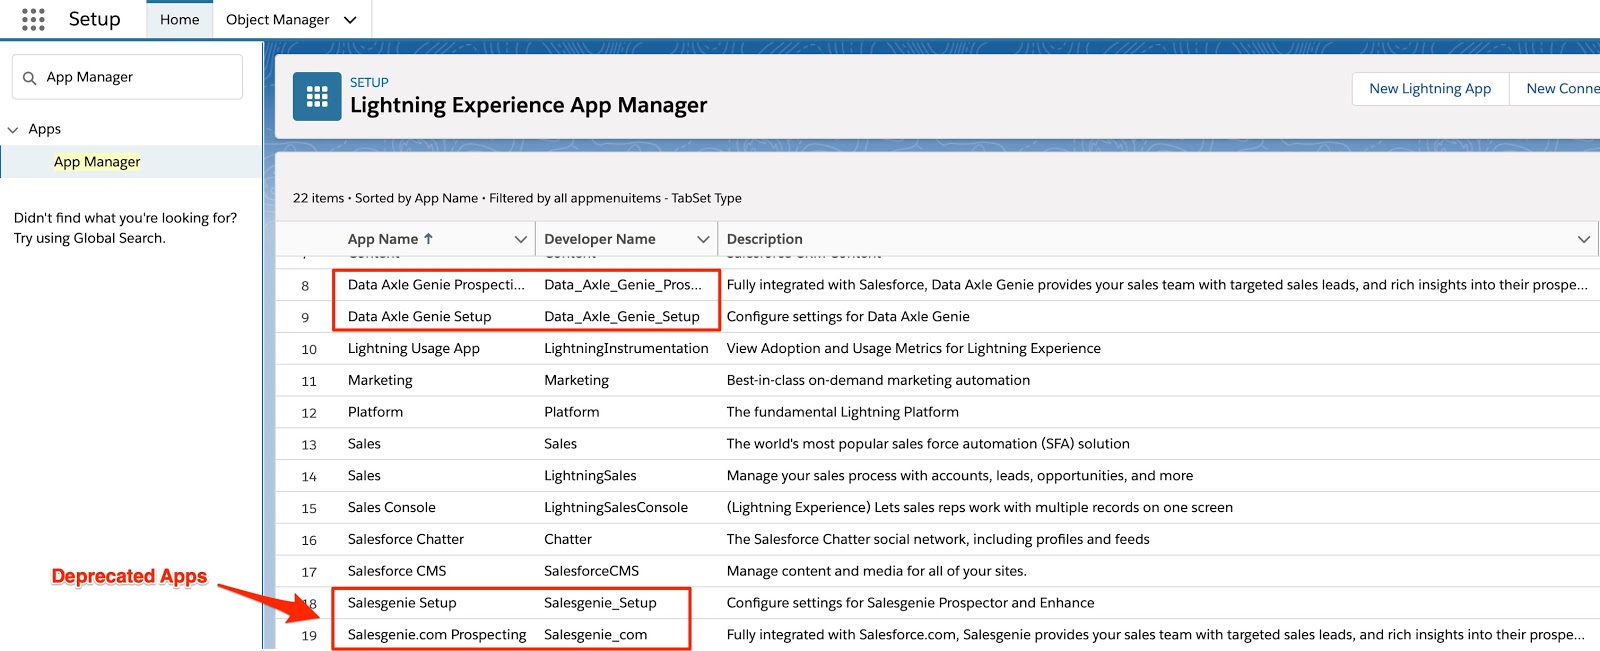
To begin this process, navigate to the Apps Manager in Salesforce Setup to view the list of Apps in the org
-
Locate the Salesgenie Setup and Salesgenie.com Prospecting apps
These are the apps that have been deprecated
Scroll to the right side of the page and look for the drop-down button for Salesgenie Setup
Click it and select Edit
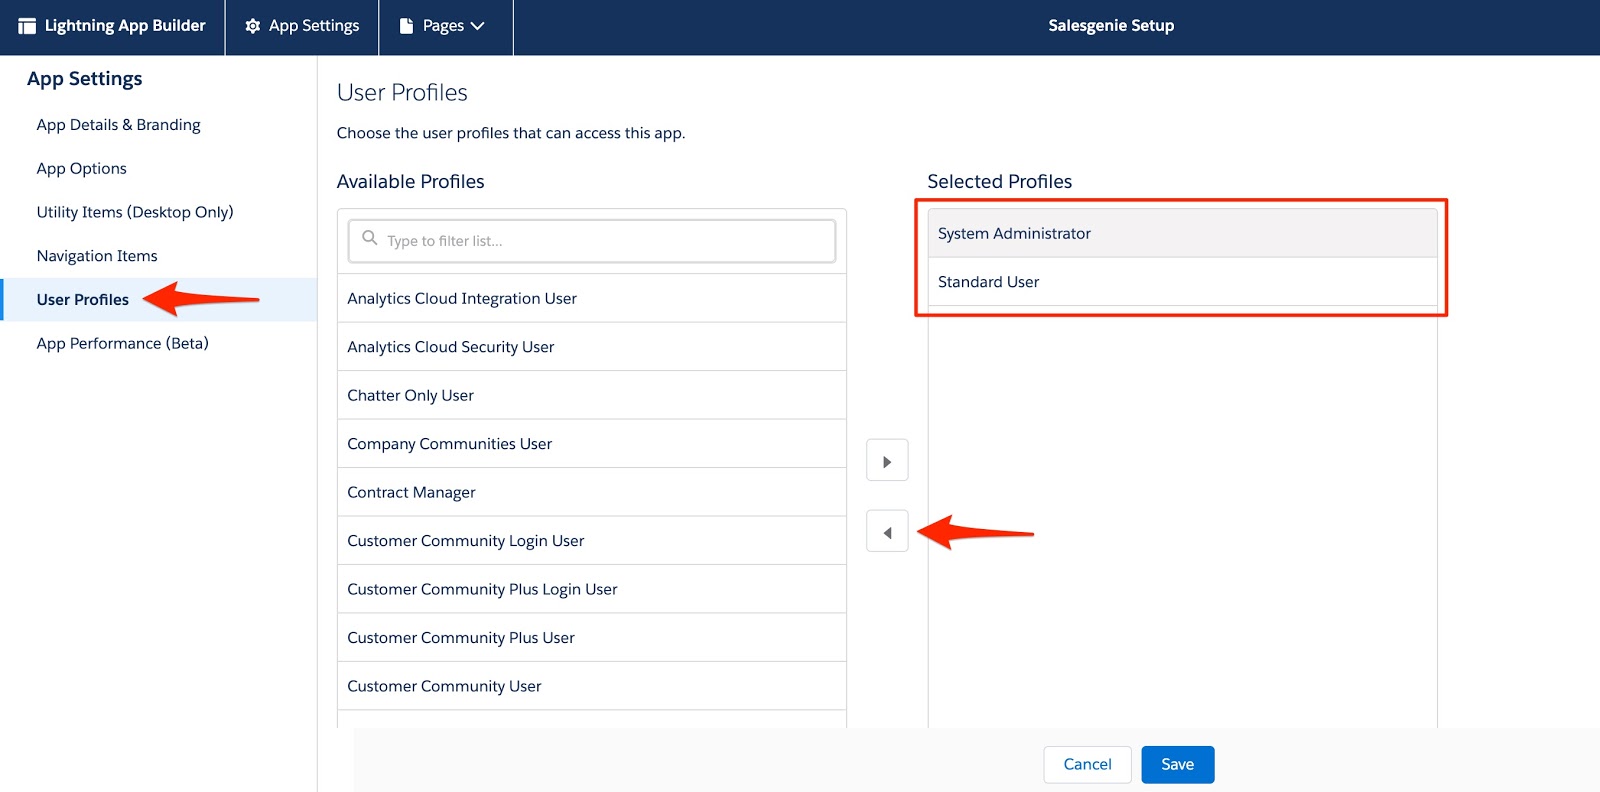
Once in the menu for editing the app, click on User Profiles on the left side menu under App Settings
Remove the Selected Profiles from the right column by clicking on each one and then on the bottom arrow, moving them back into the list of Available Profiles
-
Once finished, click Save
With the list of Selected Profiles empty, that means there are no users which will see the deprecated Apps in their App launcher
Return to the App Manager and go to Salesgenie.com Prospecting
-
Scroll to the right and click on the dropdown
Select Edit
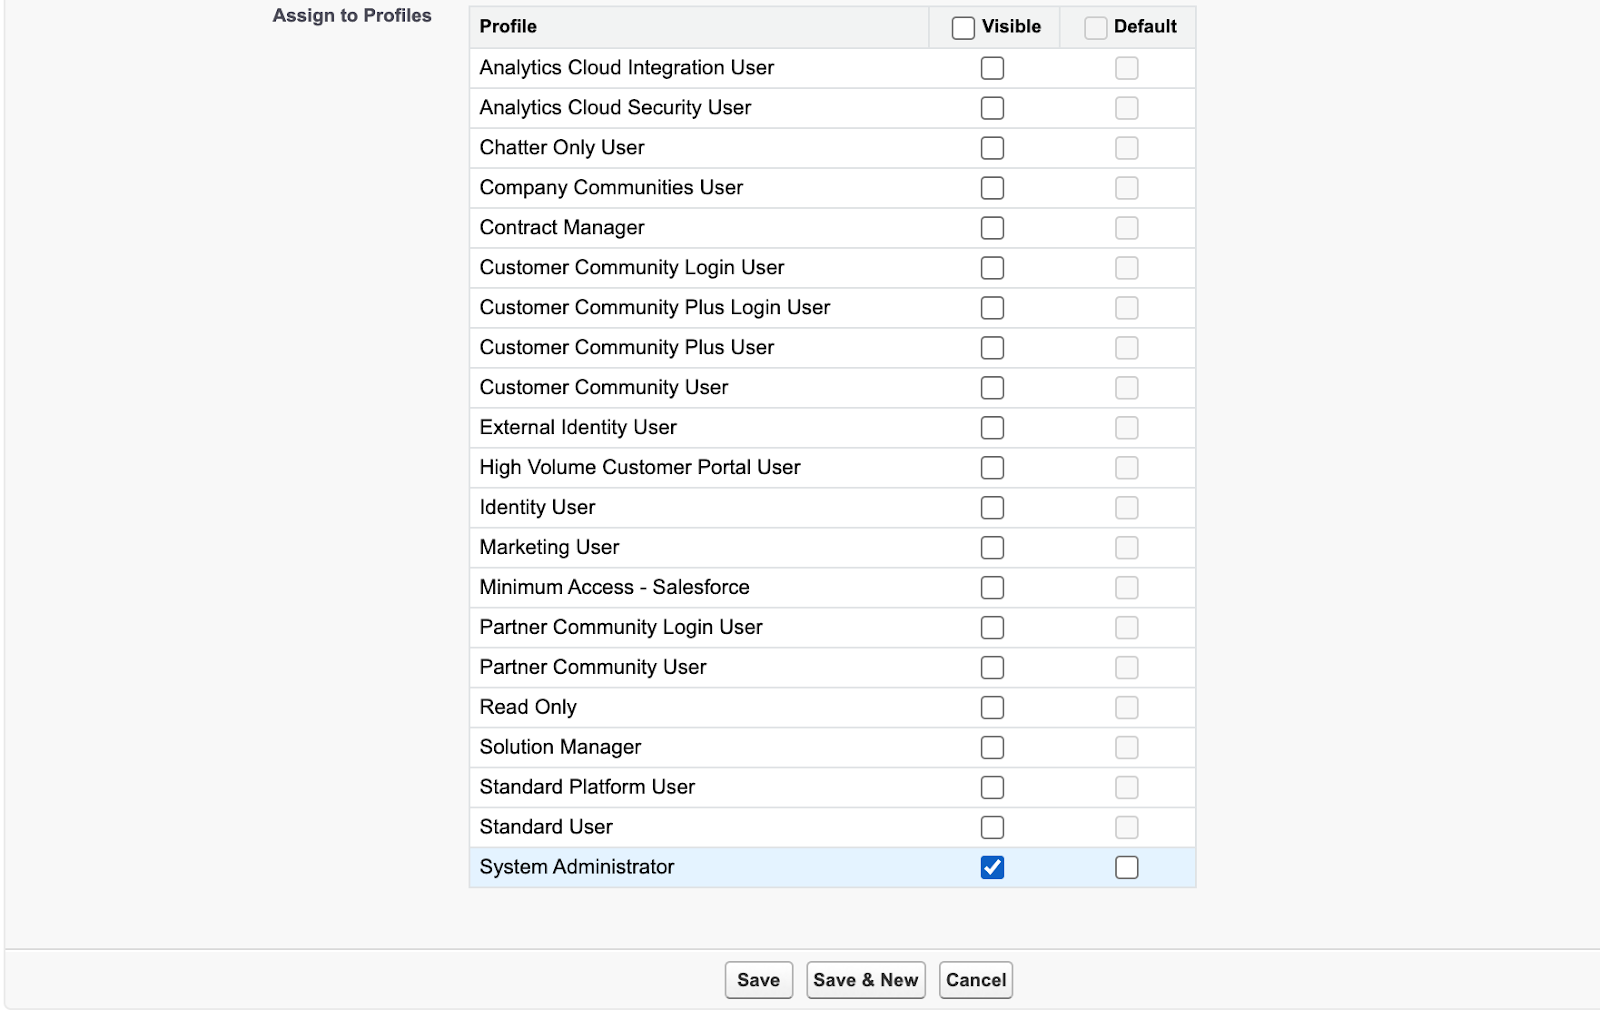
Once in the settings page for the Salesgenie Prospecting App, scroll down to the bottom to the Assign to Profiles section and uncheck any/all boxes
Once finished, the App Launcher should look like this with the Salesgenie Setup and Salesgenie.com Prospecting apps no longer appearing:
This will prevent confusion among users of the app since they will only see the updated Salesgenie Apps
Assign Permission Sets
You may return to this step later to assign permission sets to your users when you are ready to start letting them use the app.
There are three permission sets included in this package: Salesgenie Setup User, Salesgenie Prospector User, and Salesgenie Enhance User. Data Axle Salesgenie Enhance has been deprecated, so only users who have been grandfathered in from previous versions of the app will have/need access to it via the permission set.
The Salesgenie Prospector perm set will be assigned to the users who need access to the Salesgenie Prospecting tab where they will be able to build lists to import new Leads.
The Salesgenie Setup User will be assigned to the user who will be running the Salesgenie Setup app so that they can configure Prospector.
Brief note on using custom fields (not a required step, and this doesn’t pertain to custom fields that were part of package):
-
If you are using custom fields on Contact, Lead or Account that you have created in your org and will be using in the mapping sections of Salesgenie Setup, you will need to make sure your users have Read and Edit field permissions.
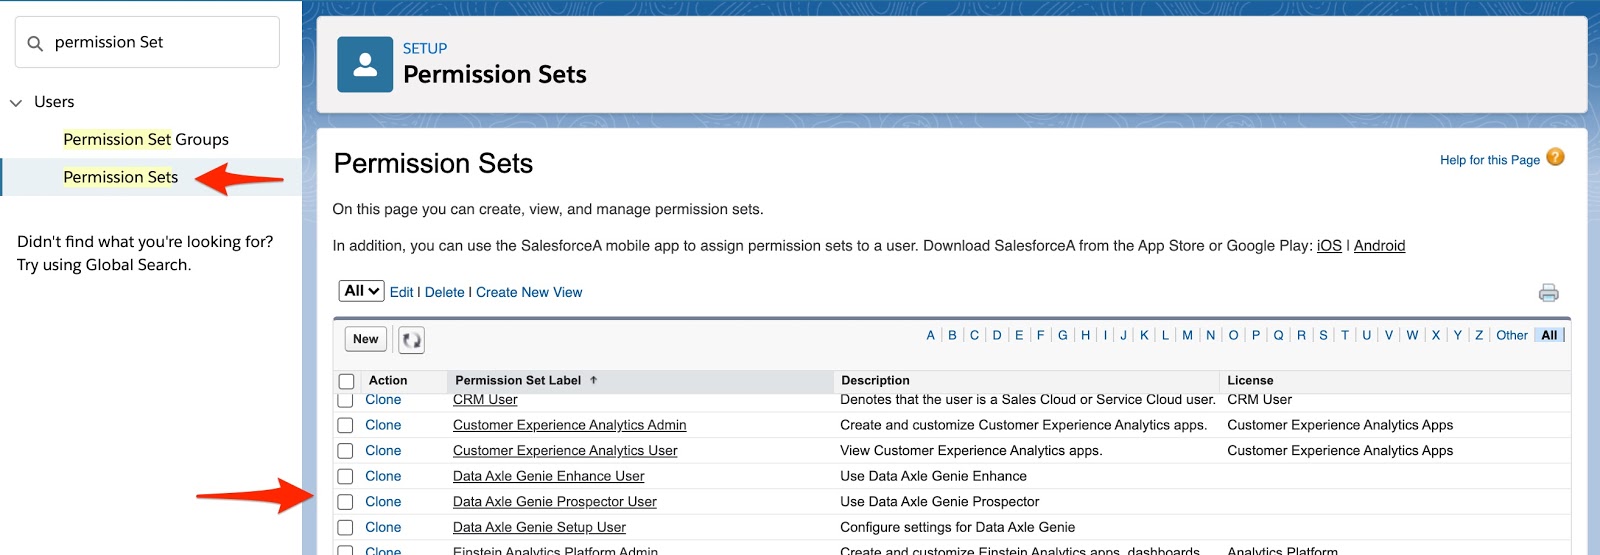
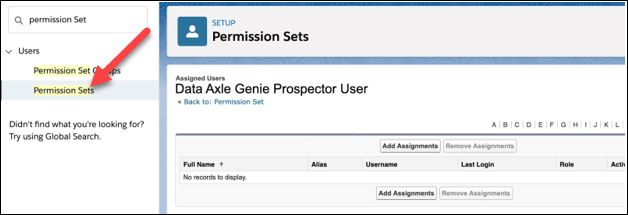
Search “Permission Sets” in the Quick Find
-
If using custom fields for Prospector (Lead):
Go to Object Settings > Select Lead > Click Edit > In the Field Permission section, give Read and Edit access to your custom fields
Navigate to the Quick Find and search “Permission Sets” > Click the permission set
Clone the Permission Sets
- Click on Clone next to the Salesgenie Setup User

- Type "Salesgenie Setup User Clone" in the Label box, then click Save

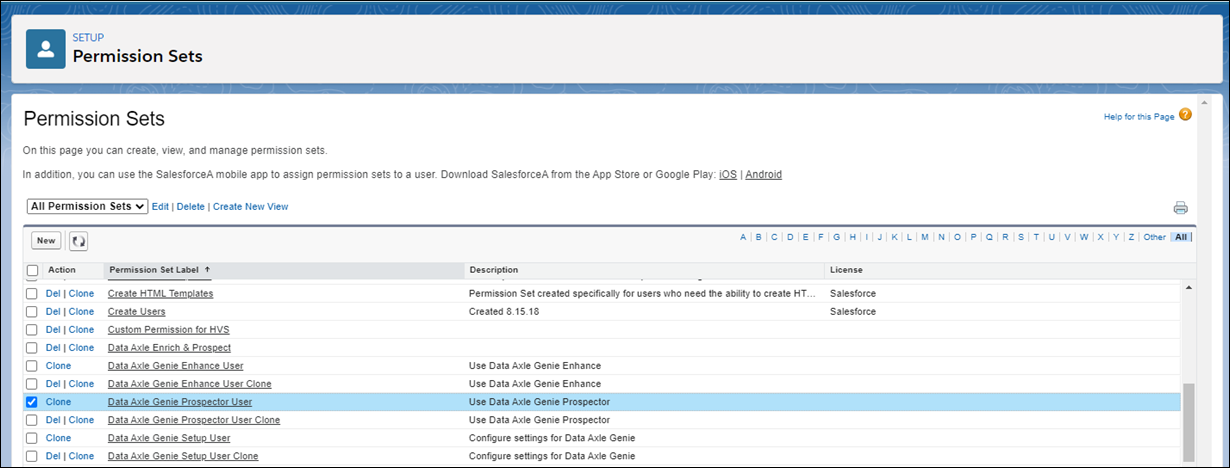
- Click on Clone next to Salesgenie Prospector User

-
Type "Salesgenie Prospector User Clone" in the Label box, then click Save

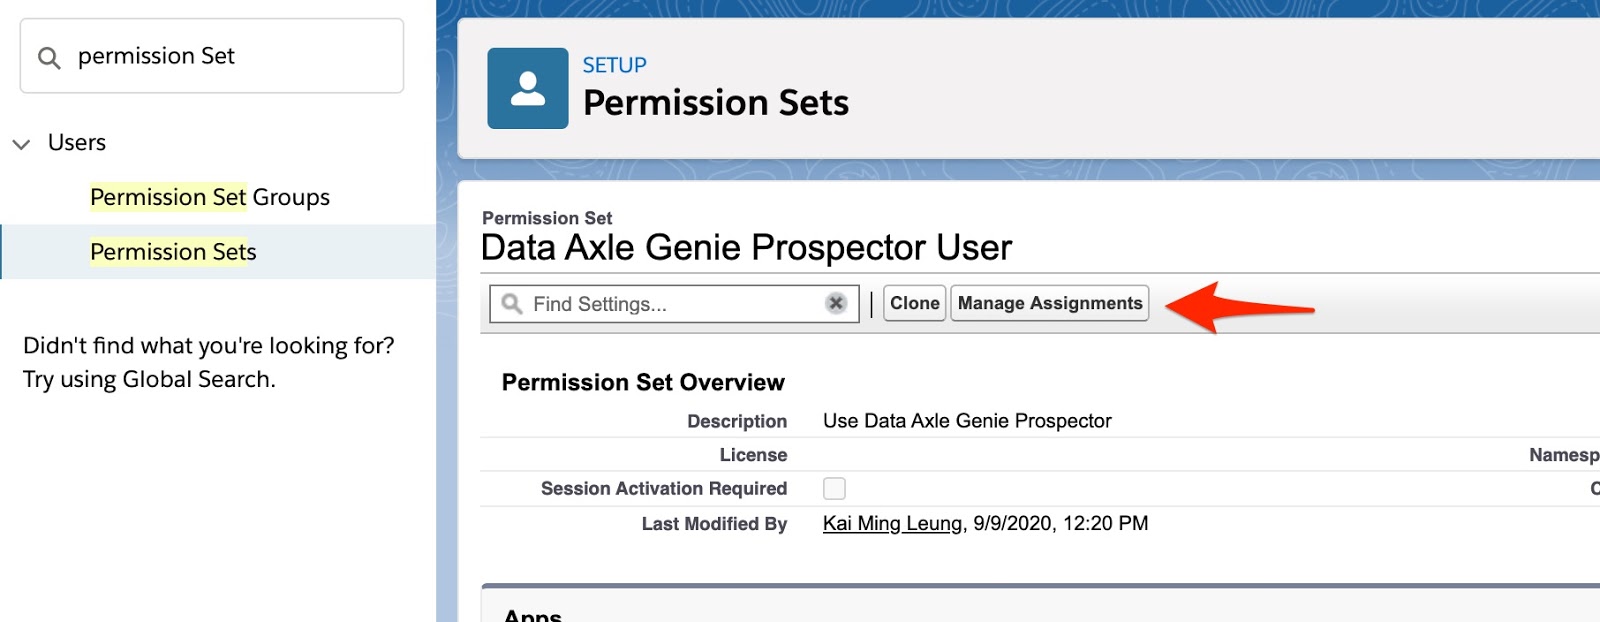
Click Manage Assignments
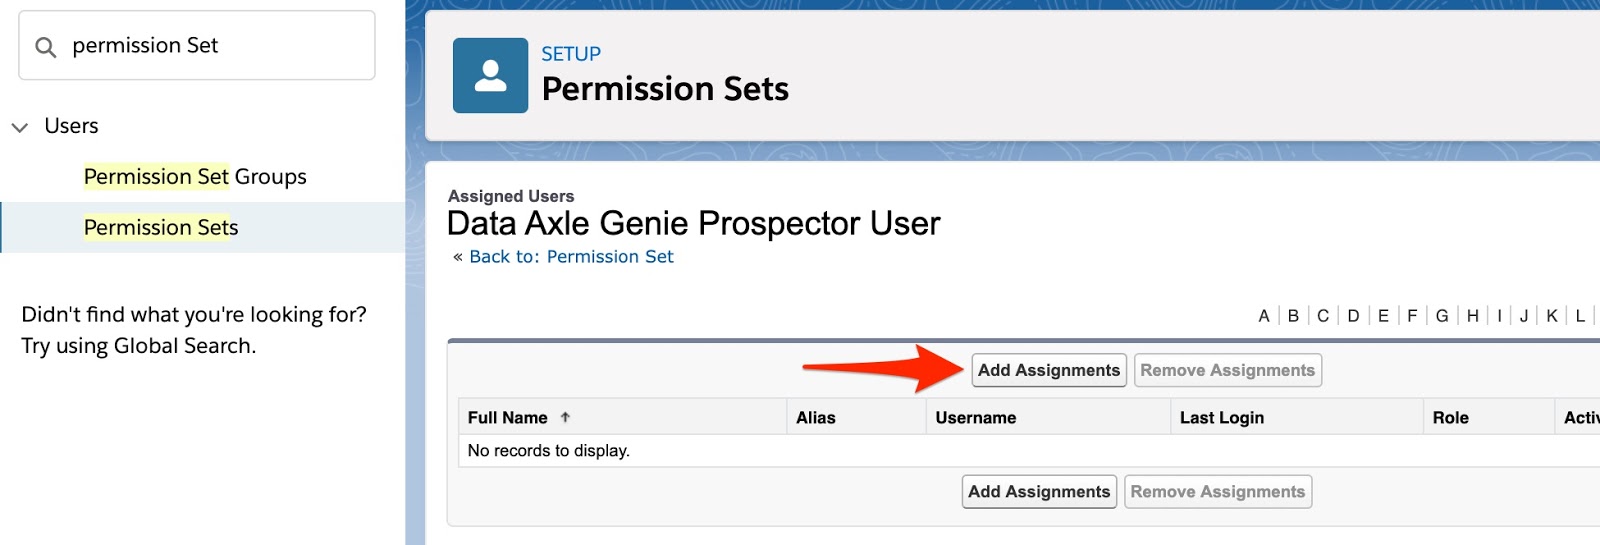
Click Add Assignments
Select the Users > Click Assign
Click Done
Repeat steps to assign the other two permission sets to their respective users
To ensure all settings are enabled, click on Permissions Sets
Click on Salesgenie Prospector User
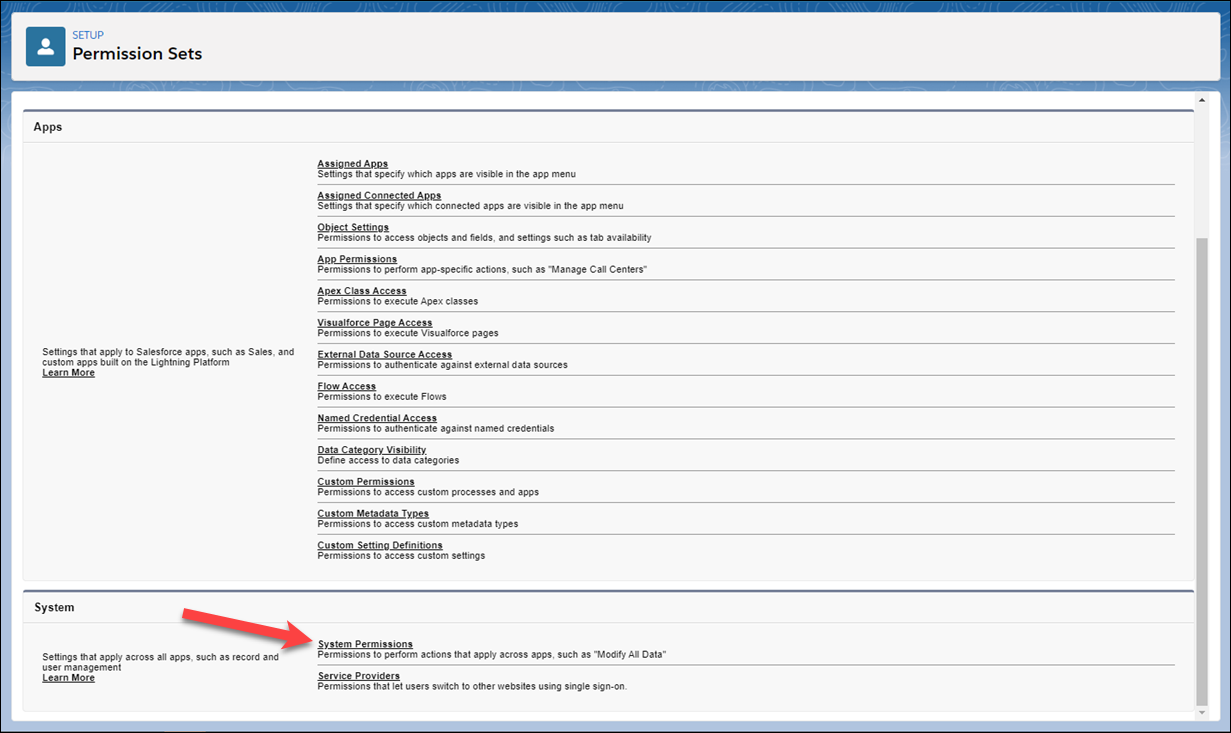
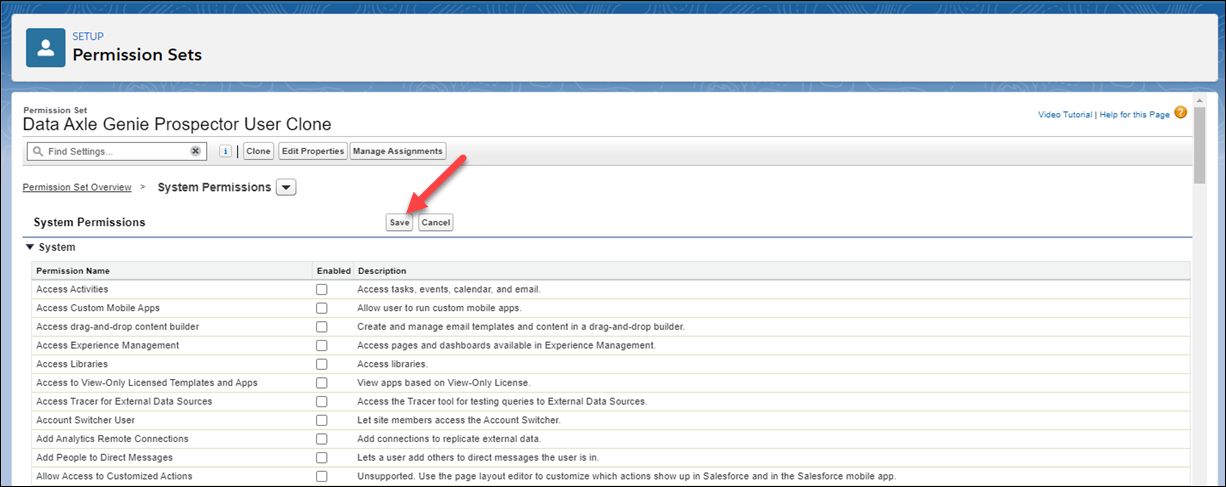
Click on System Permissions
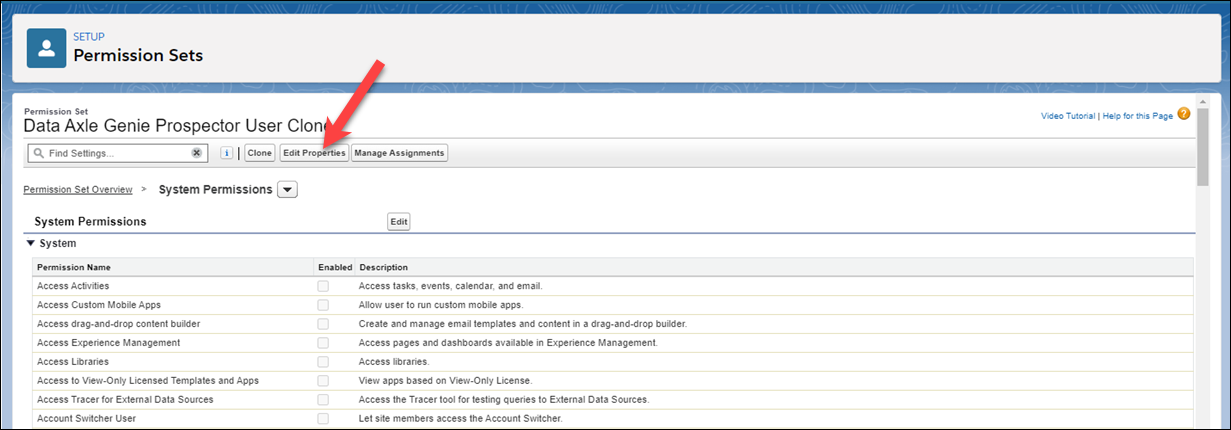
Click Edit Properties
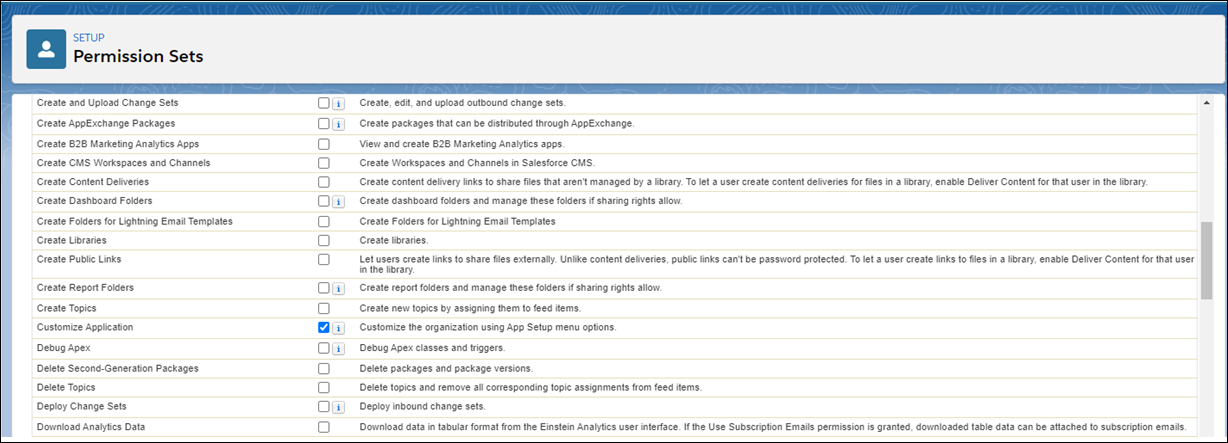
Select to enable required settings (recommended: Customized Application, Manage Custom Permissions, View Roles and Role Hierarchy, View Setup and Configuration)
Click Save
Run the Salesgenie Setup App
Click the App Launcher
Select Salesgenie Setup
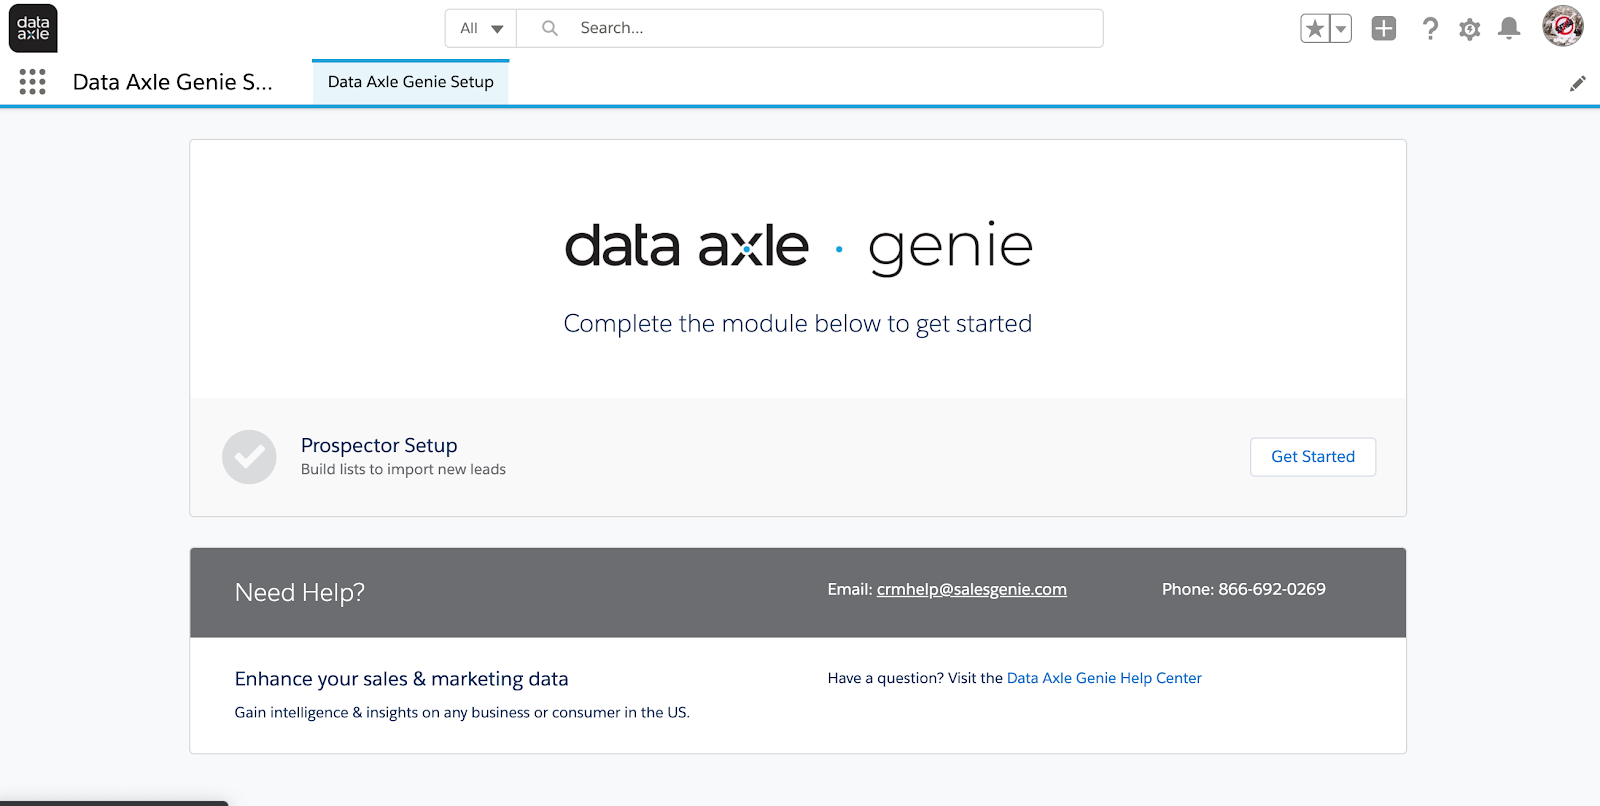
To configure settings for Prospector so that your users can build lists to import new Leads, click Get Started
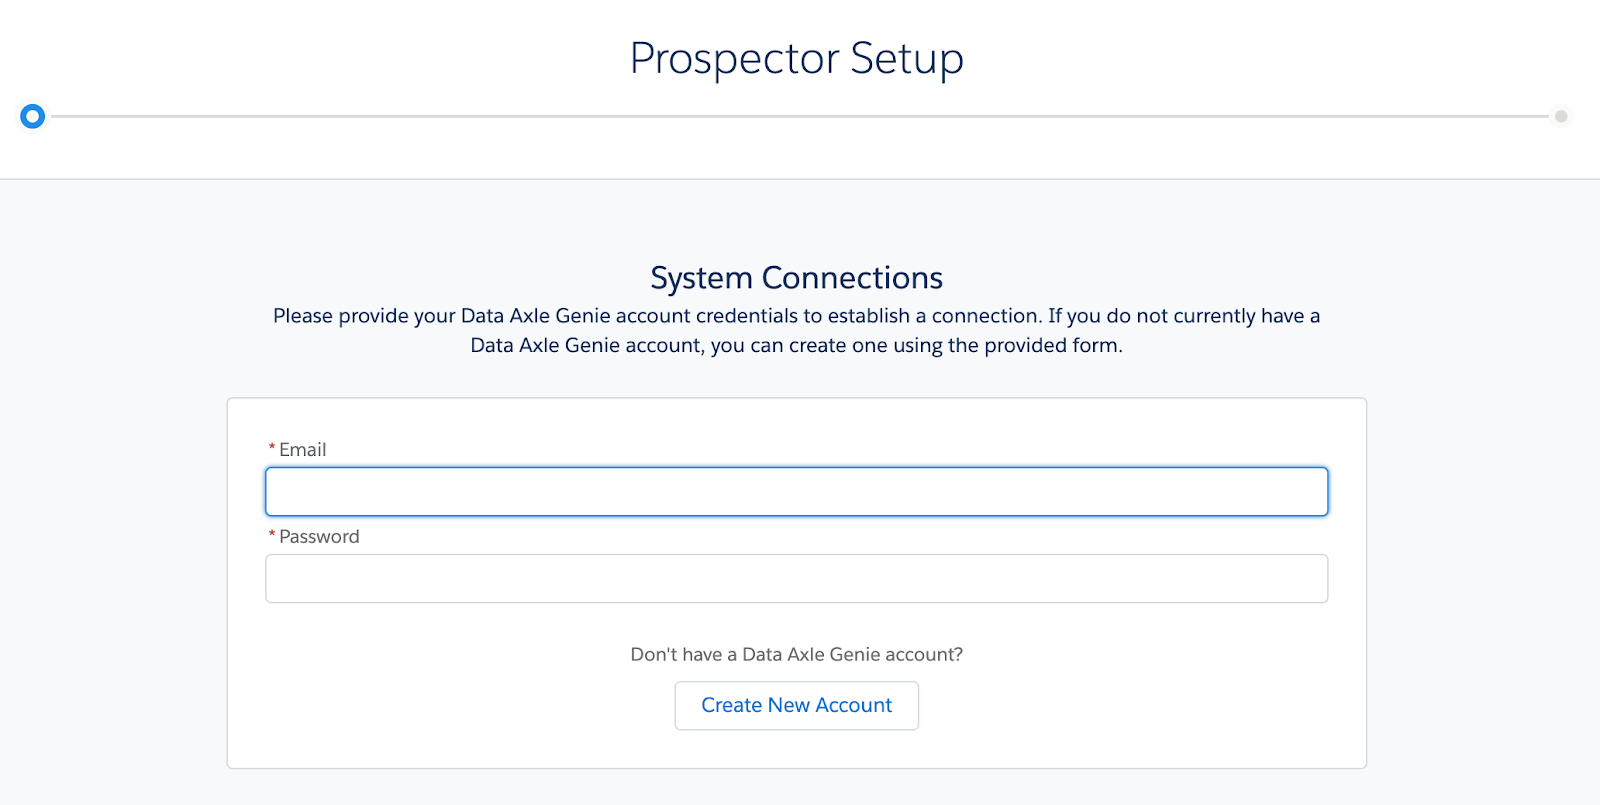
The first part of Prospector Setup is System Connections where you will need to provide Email and Password to establish connection with Salesgenie. If you need to create a new account, click Create New Account
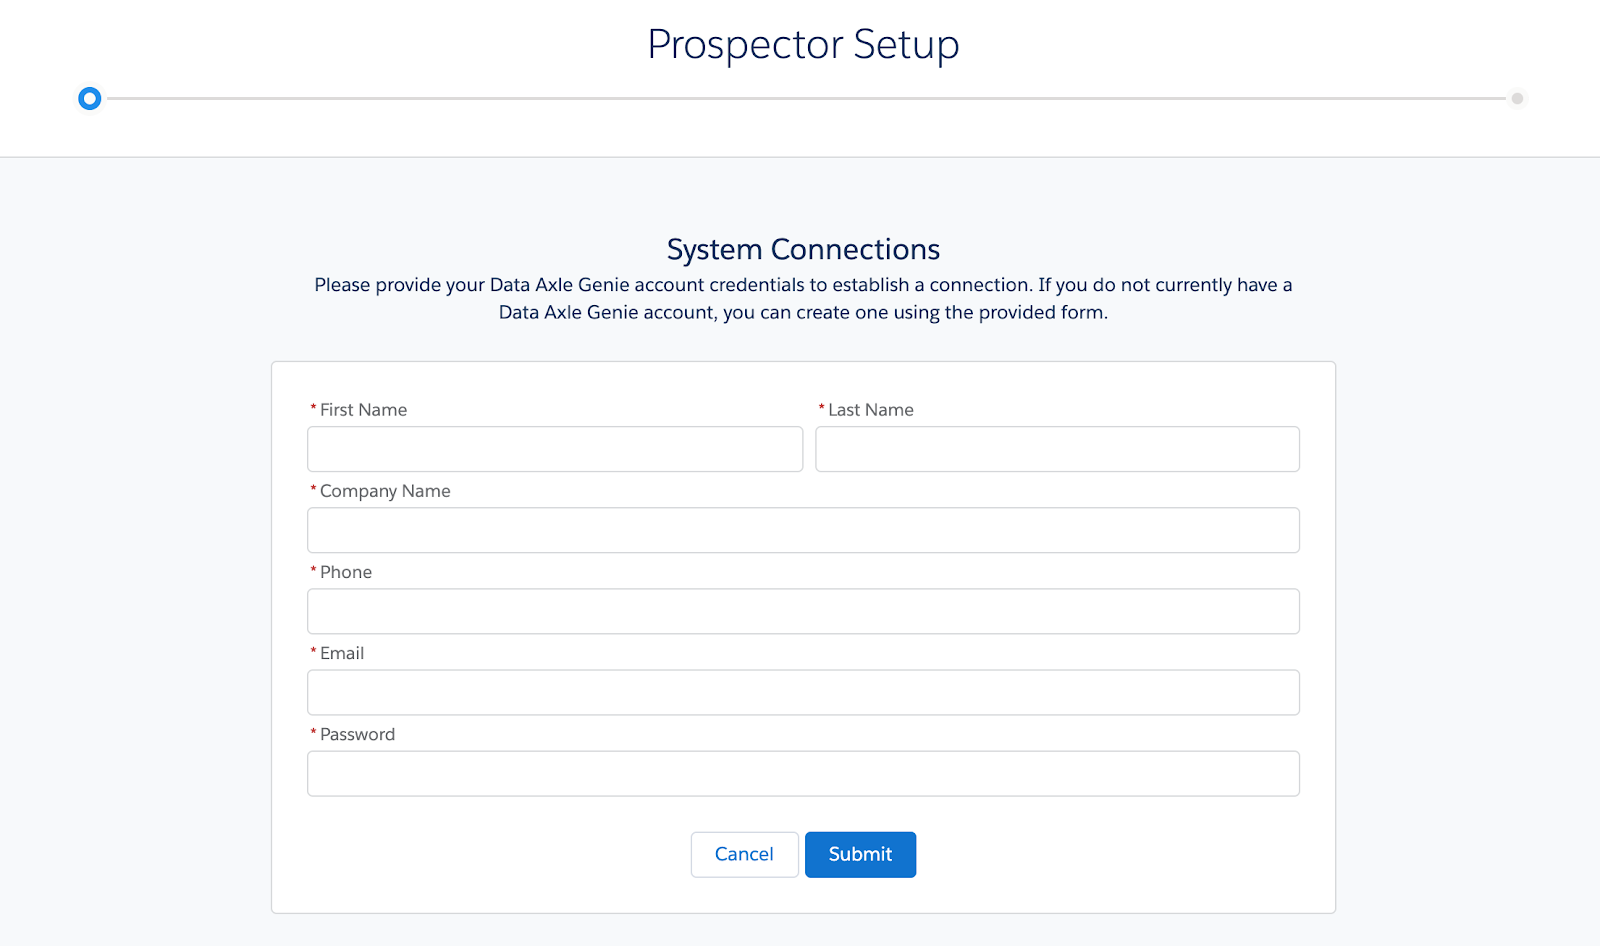
Enter in First Name, Last Name, Company Name, Phone, Email and Password > Click Submit
Once your account has been created, click Next
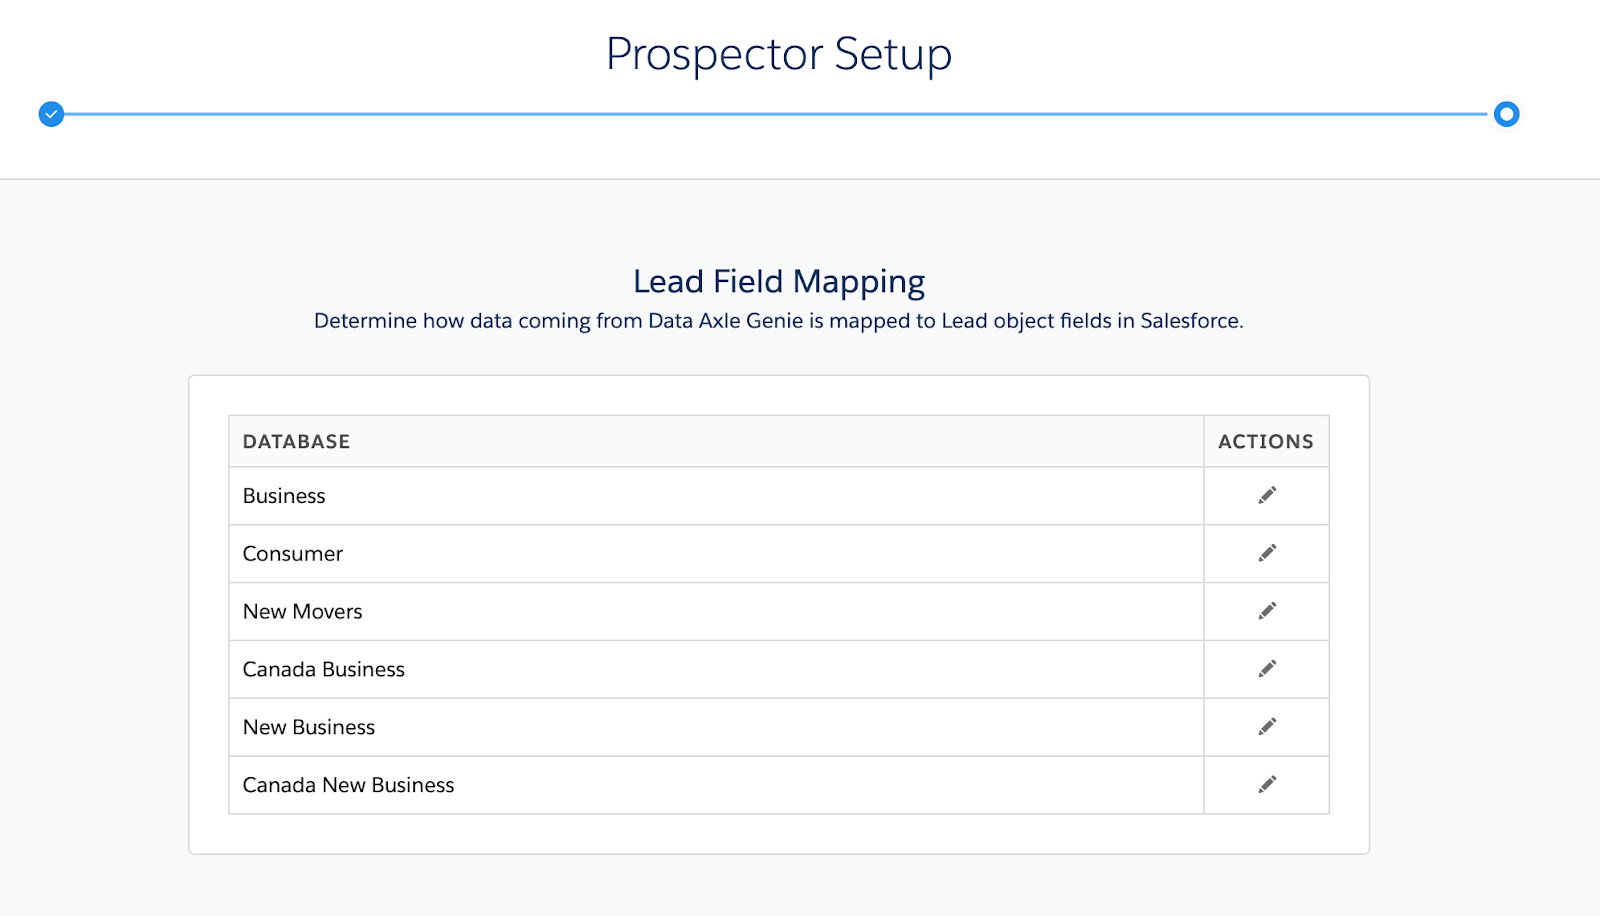
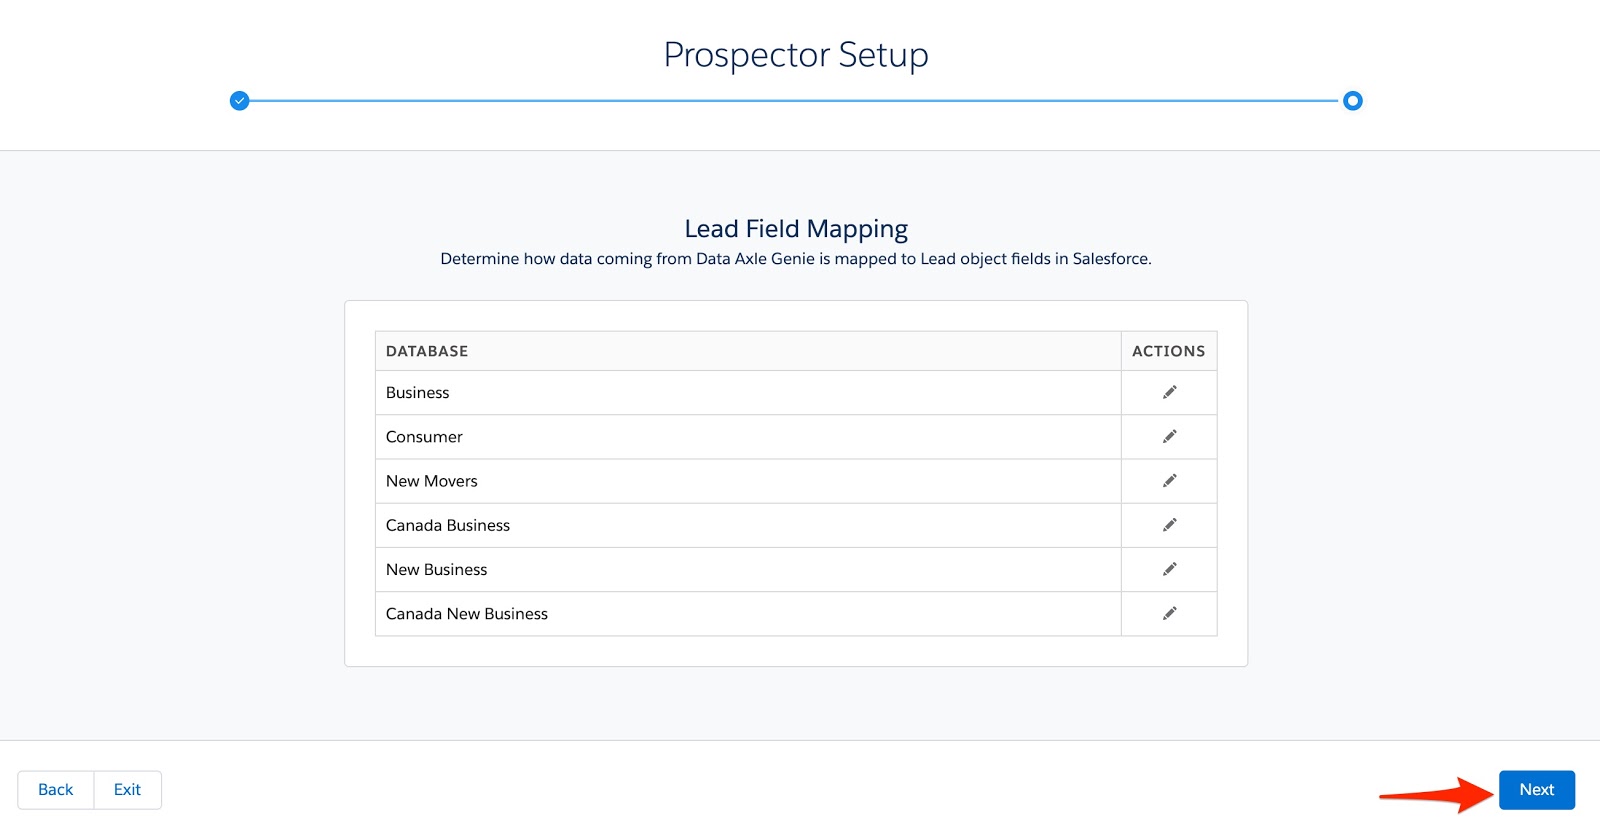
The next step is Lead Field Mapping where you will determine how data coming from Salesgenie is mapped to Lead object fields in Salesforce > Click Edit to review default mappings and add additional mappings
-
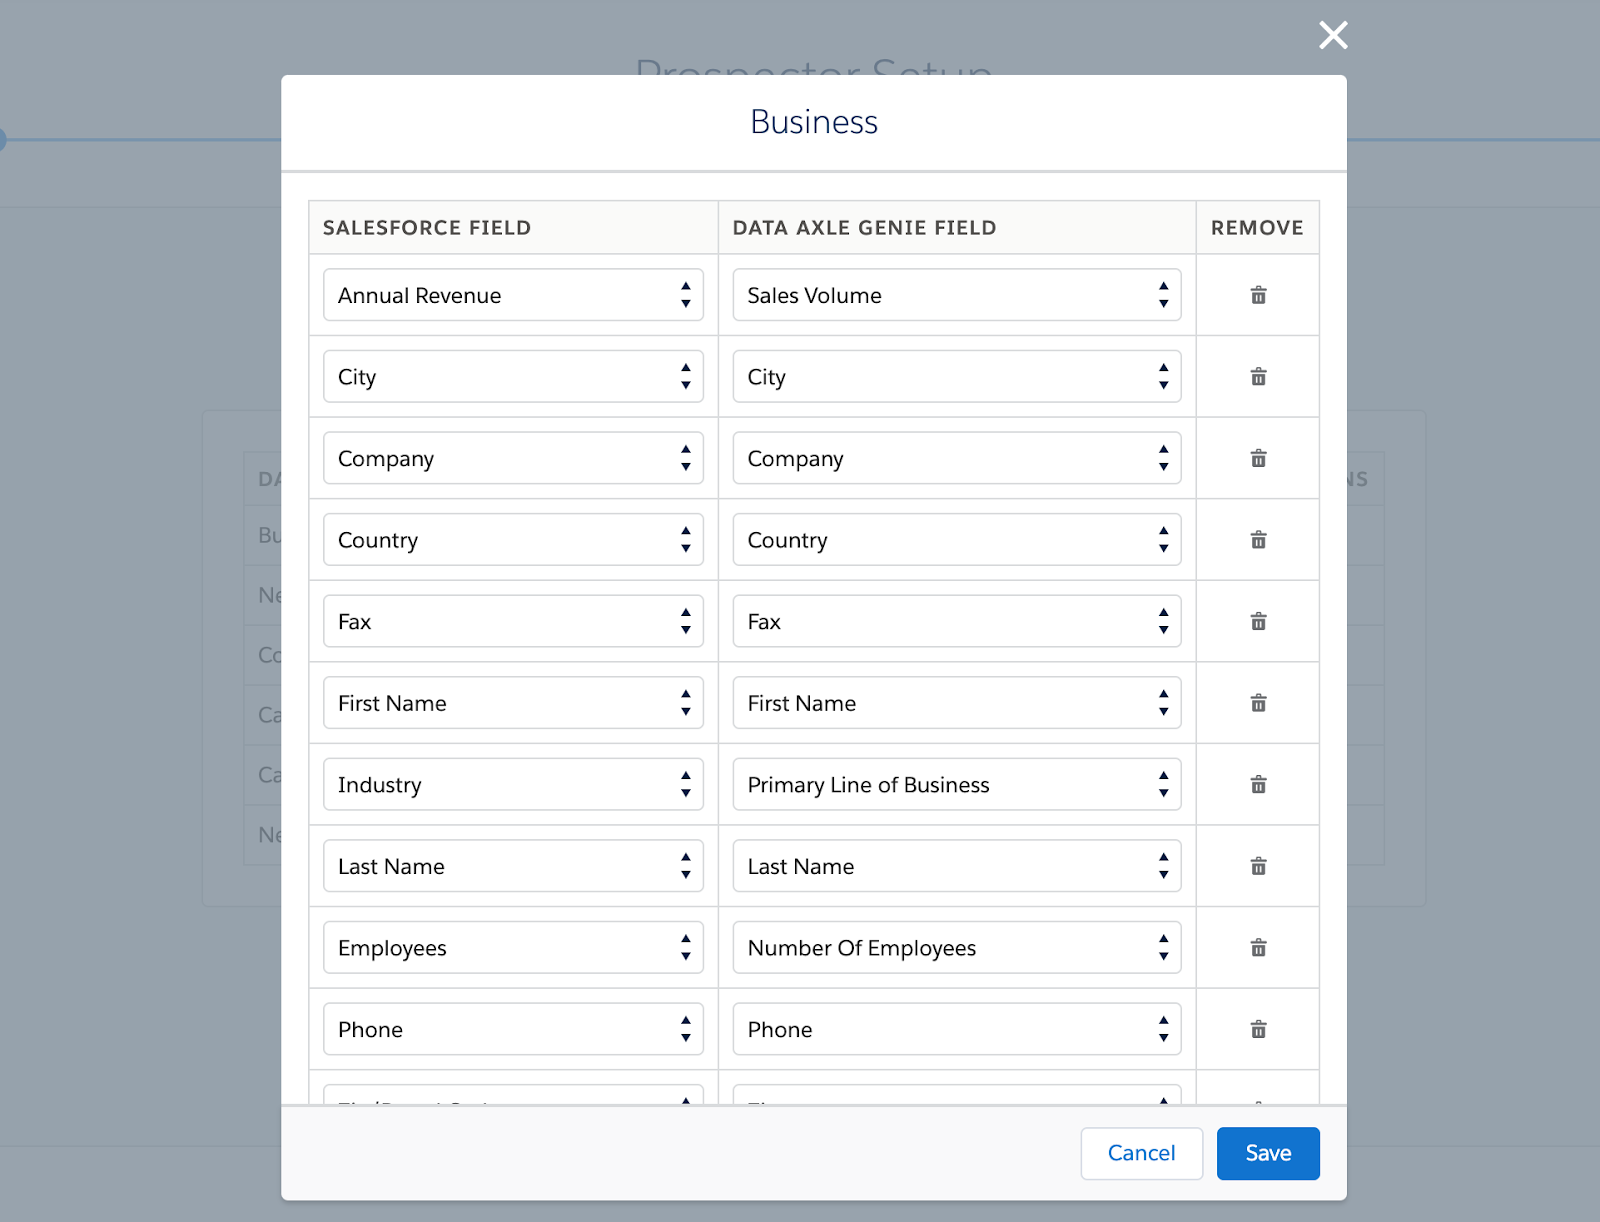
You will see a list of default mappings. You may also add and remove additional mappings, as well as use custom Salesforce fields that you create
You should also be sure to add these fields onto your page layout
When finished, click Save
Repeat this for each Database > Click Next when finished
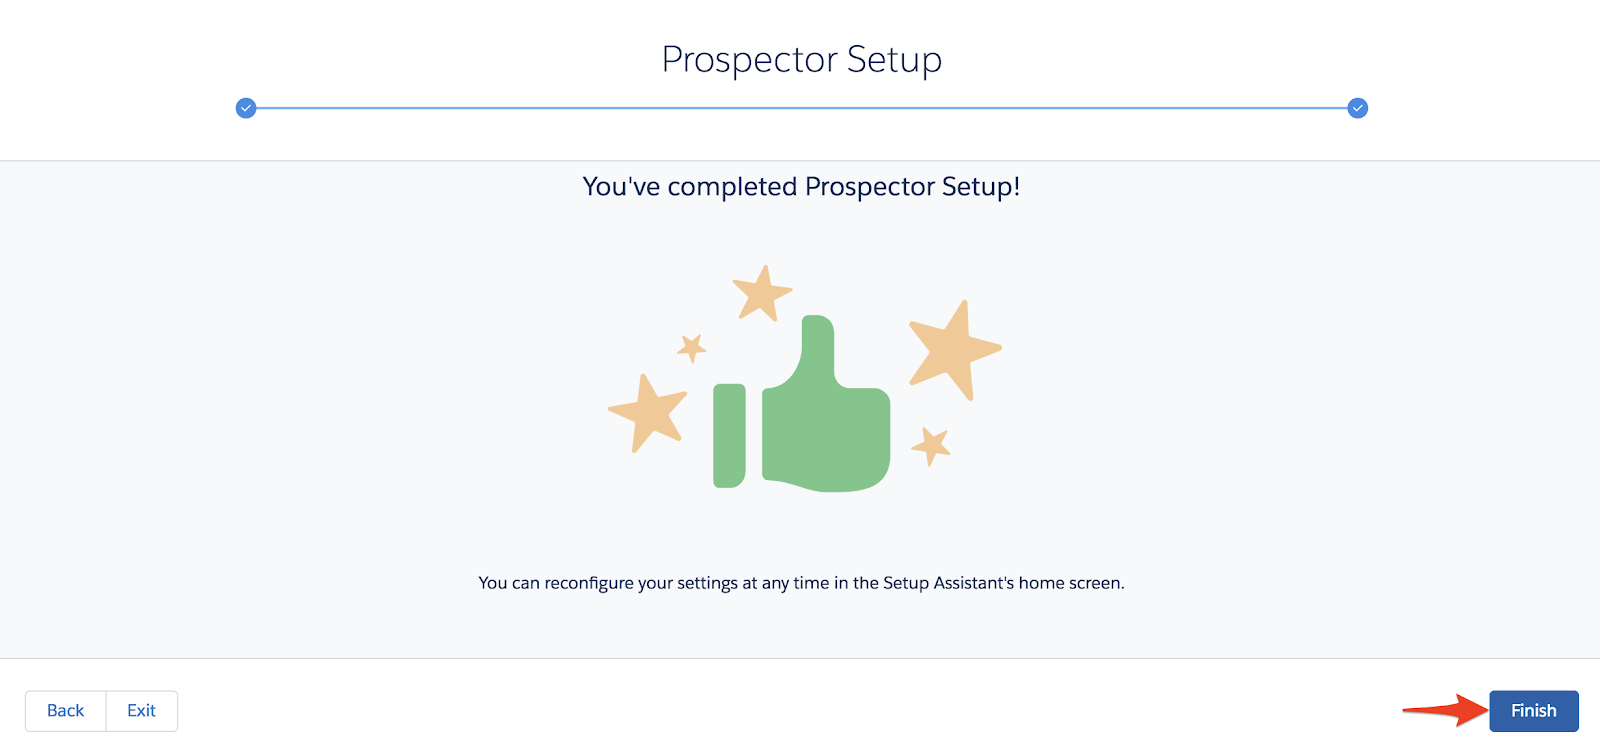
Click Finish
With Setup complete, an Admin may return at any time to make changes to the field mappings as required.
Supplementary Configuration
Map Lead Fields for Lead Conversion
In the Field Mappings section of the Salesgenie Setup app, you will be able to use custom Salesforce fields in your mappings. However, keep in mind that when converting Leads to Contacts, you will need to map your custom Lead fields to the corresponding Contact fields in order to make sure your data transfers to the Contact upon Lead conversion.
Reference the Salesforce resource below for more information on mapping custom Lead fields for Lead conversion:
https://help.salesforce.com/articleView?id=customize_mapleads.htm&type=5
This section will show you an example of creating a custom field and then how to make sure that the data will get carried over from Lead to Contact on Lead conversion.
Create a custom field on Lead and Contact:
Click the Object Manager > Select Lead
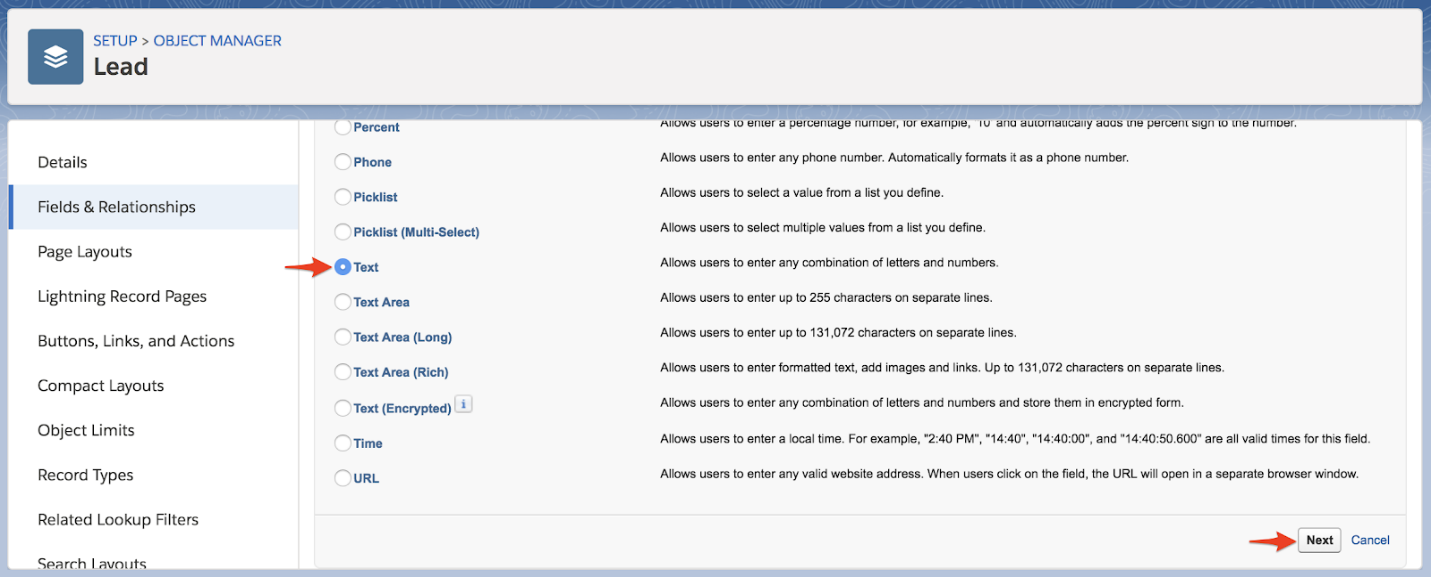
Select Fields & Relationships > Click New
Select the Data Type for your custom field > Click Next
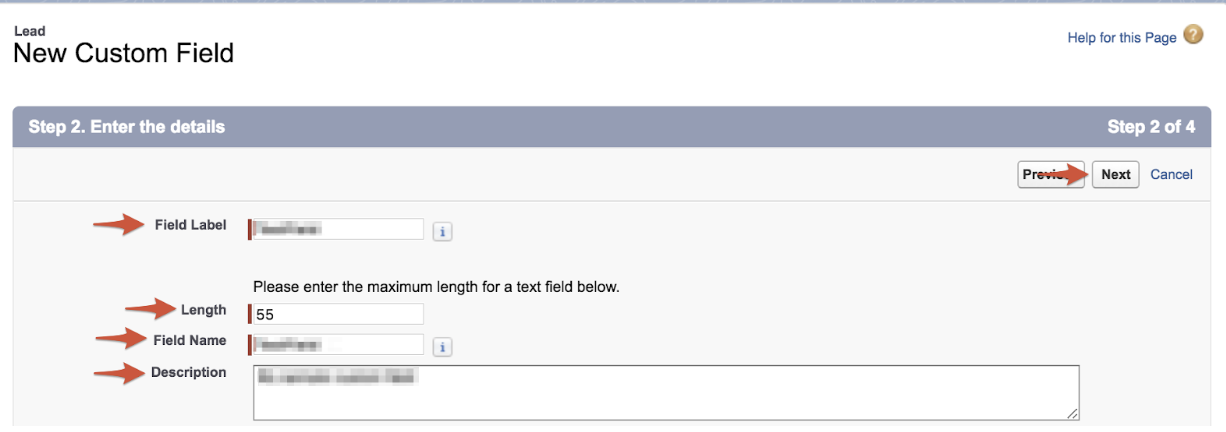
Enter a Field Label and any required details based on the Field Type
Enter a Field Name
Enter a Description
Click Next
Repeat
the steps above to create a custom field on Contact. This field will
be used when you Map Lead Fields in the next section.
Map Lead Fields:
Click the Object Manager > Select Lead
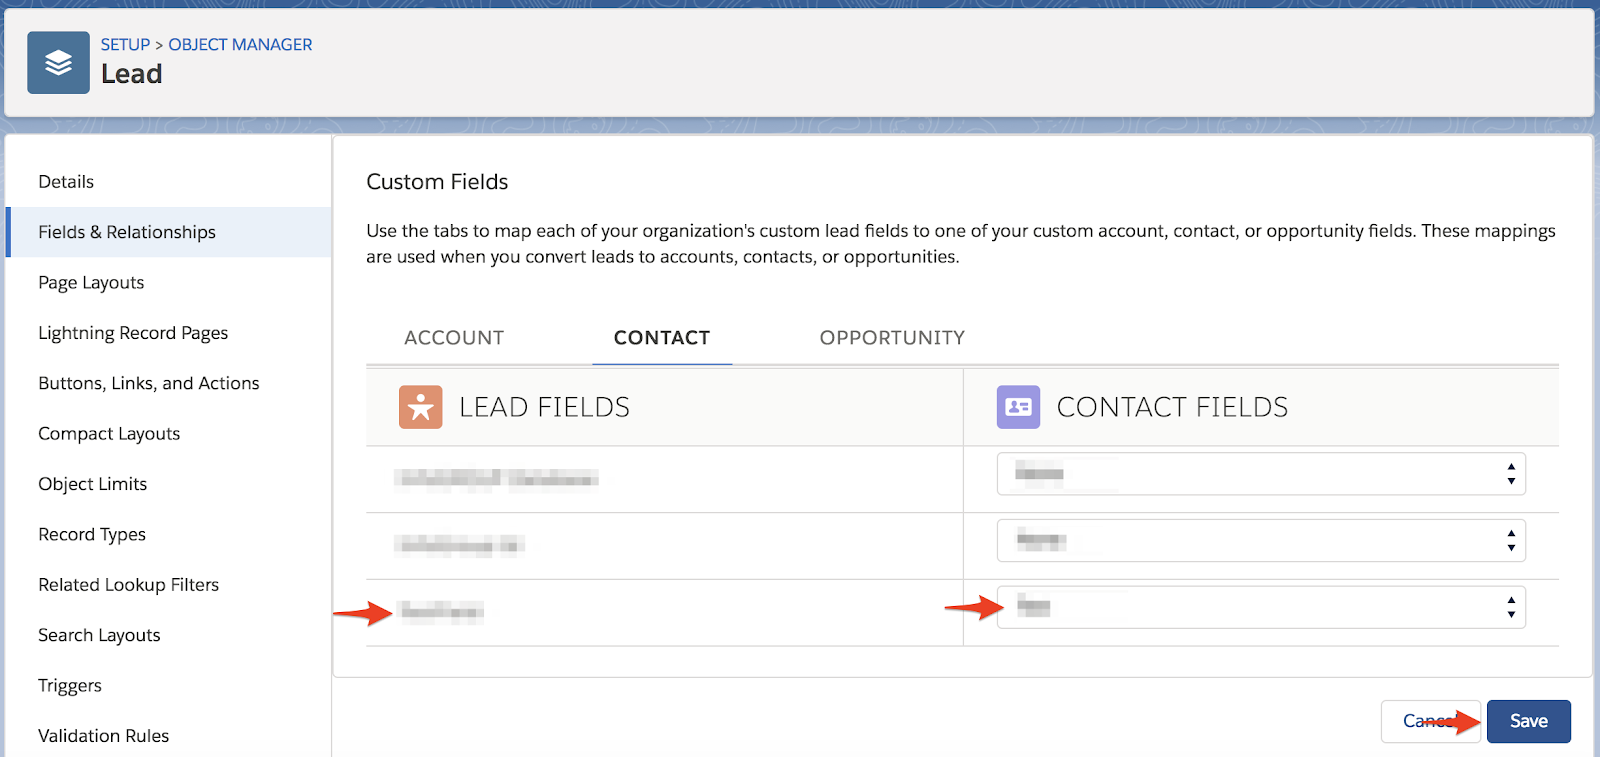
Select Fields & Relationships > Click Map Lead Fields
Note your custom Lead field > Click the Contact tab
Select your corresponding custom Contact field to map to your custom Lead field
Click Save
Duplicate Management Sample
The purpose of the Duplicate Management sample is to show an example of how you may prevent duplicates in Salesforce by creating and activating a Matching Rule and Duplicate Rule. This sample will set up two rules that when the Salesforce User tries to create a Contact with a First Name, Last Name, and Mailing Street that matches another those fields on another Contact, they will be unable to do so. The fields specified above will be part of the Matching Rule and are strictly for sample purposes as other fields may be used. This may also be created similarly for other objects as well. To take this a step further, we will use fuzzy matching on the Last Name.
For more information on Matching Rules reference this link:
https://help.salesforce.com/articleView?id=matching_rule_map_of_reference.htm&type=0
For more information on Duplicate Rules reference this link:
https://help.salesforce.com/articleView?id=duplicate_rules_map_of_reference.htm&type=0
Follow these steps to set up your Matching Rule:
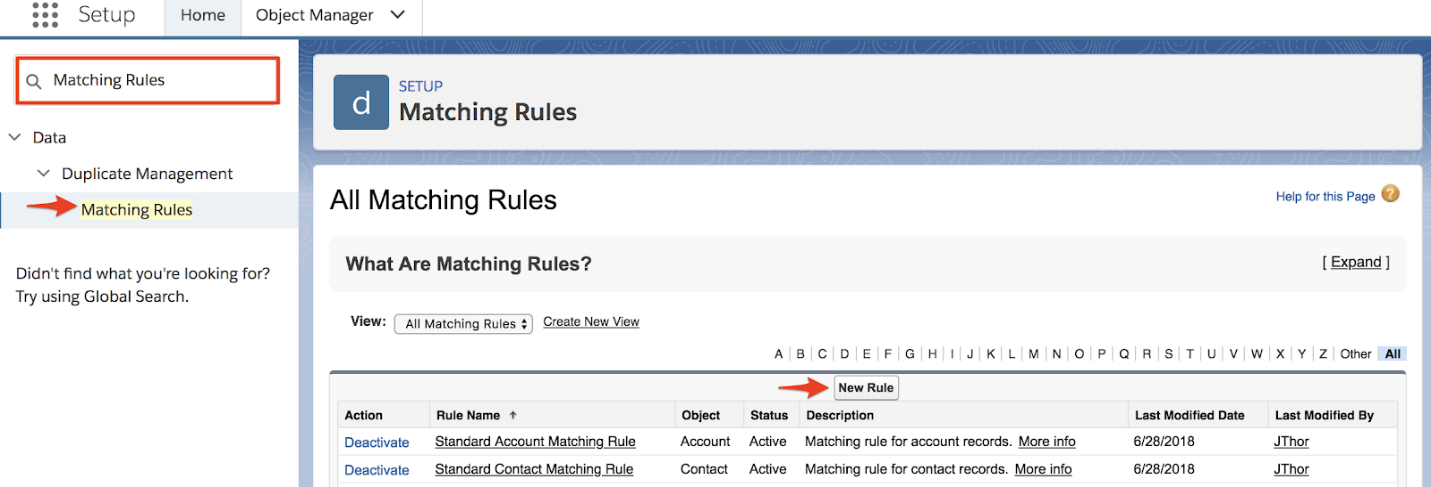
Navigate to the Quick Find and search “Matching Rules” under Duplicate Management
Click New Rule
Select Object - Contact
Click Next
-
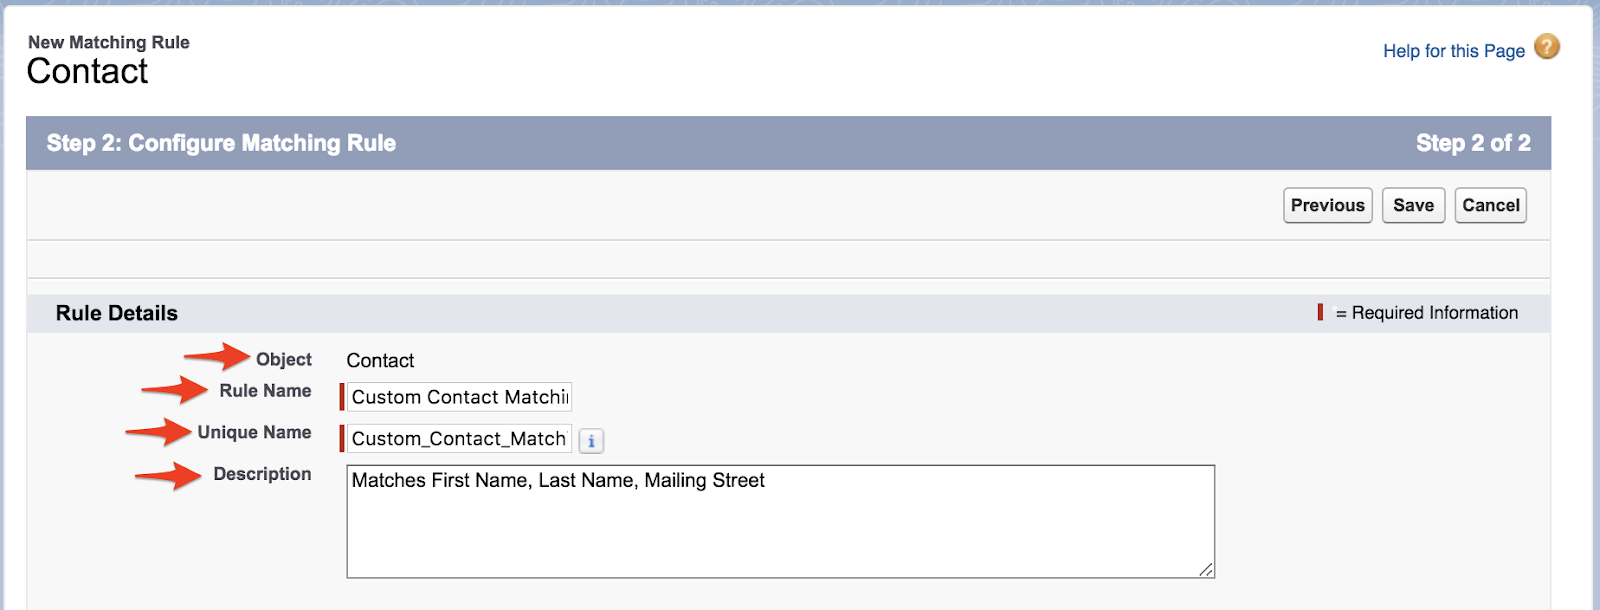
Configure your Matching Rule
Enter Rule Name - Custom Contact Matching Rule
Unique Name will automatically populate
Enter Description - Matches First Name, Last Name, Mailing Street
-
Specify your matching criteria
Field - First Name, Matching Method - Exact
Field - Last Name, Matching Method - Fuzzy: Last Name
Field - Mailing Street, Matching Method - Exact
Click Save
Click Activate
Click OK
Follow these steps to set up your Duplicate Rule:
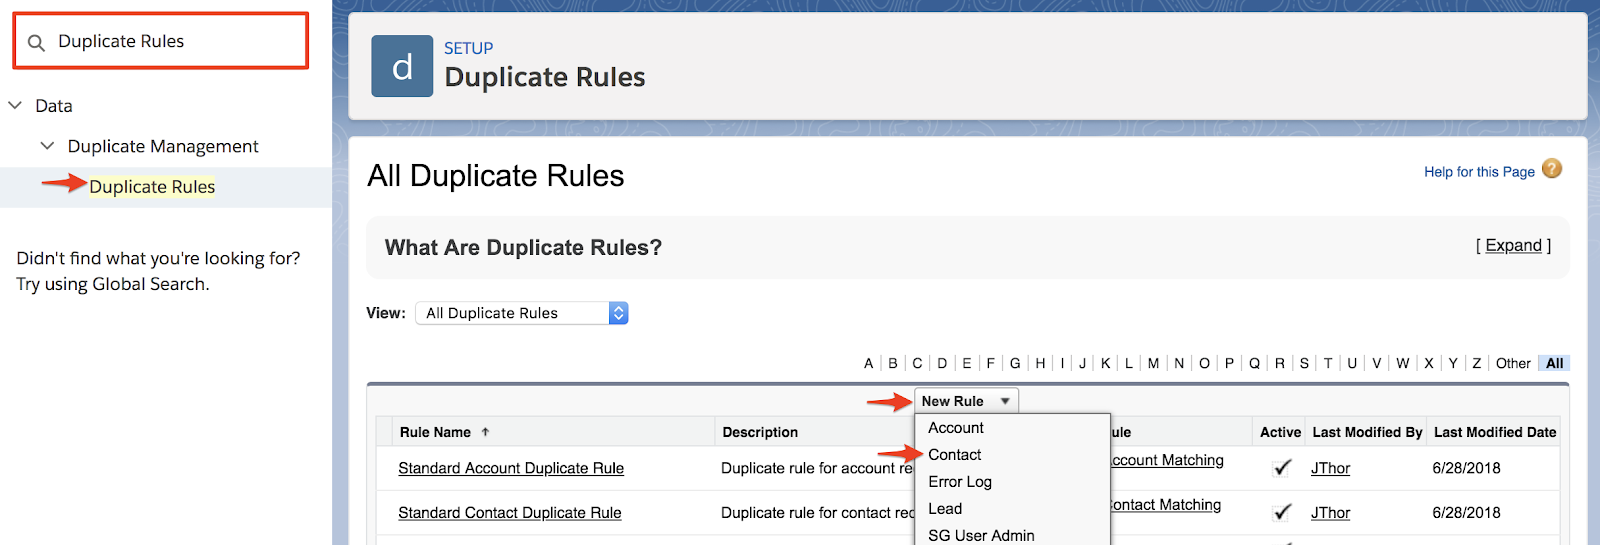
Navigate to the Quick Find and search “Duplicate Rules” also under Duplicate Management
Click New Rule > Select Contact
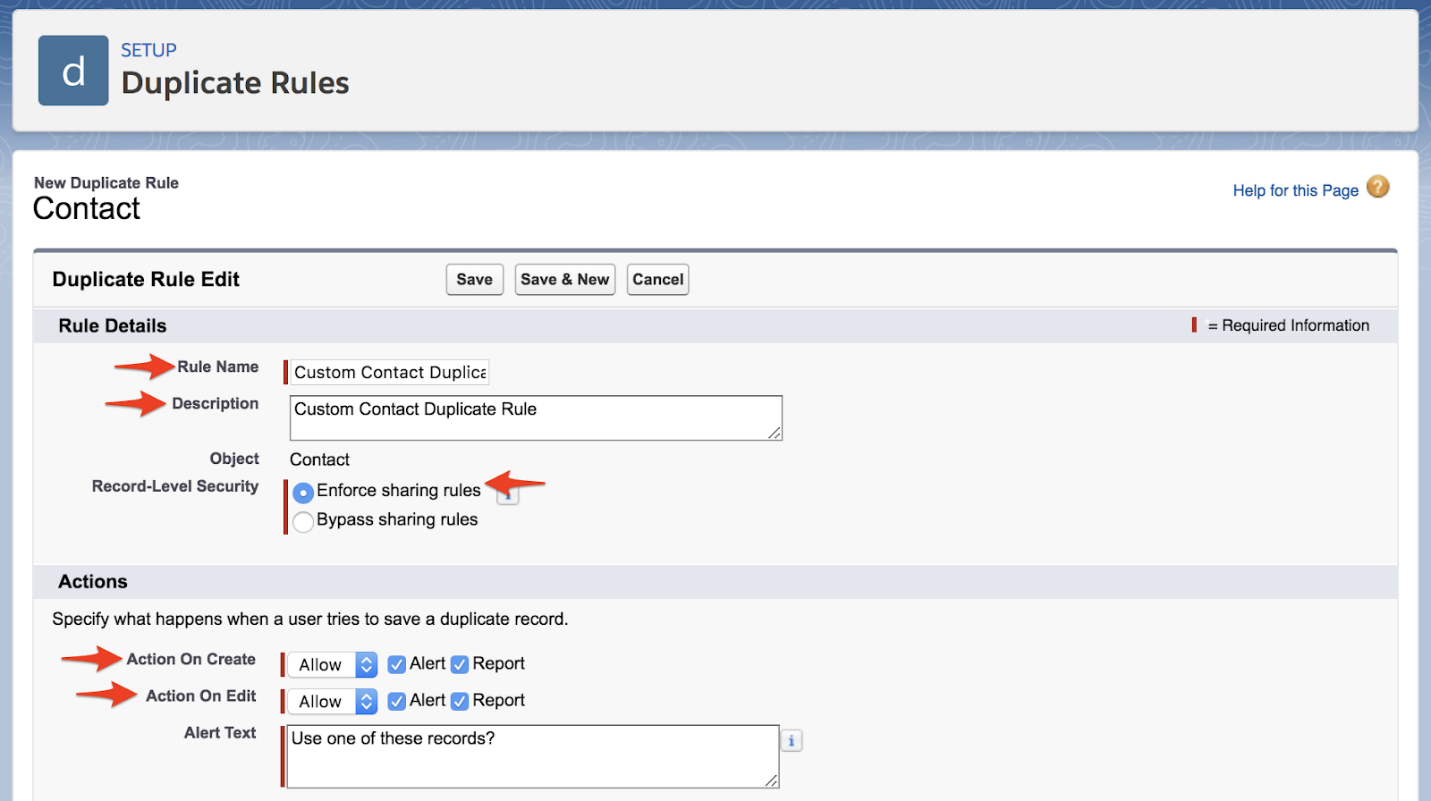
Enter Rule Name - Custom Contact Duplicate Rule
Enter Description - Custom Contact Duplicate Rule
Specify Record-Level Security - Enforce sharing rules
-
Specify what happens when a user tries to save a duplicate record
Action On Create - Allow, Alert, Report
Action On Edit - Allow, Alert, Report
-
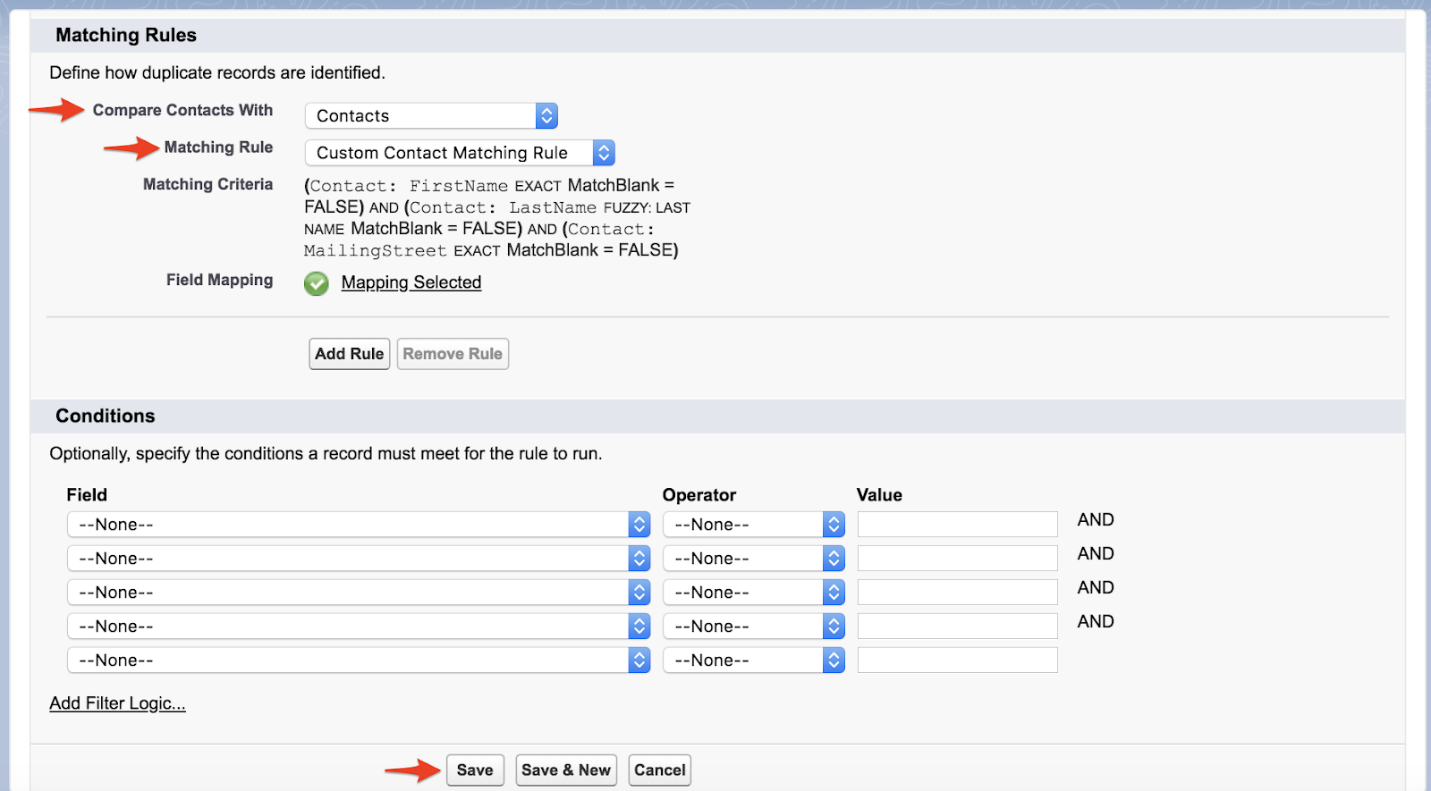
Define how duplicate records are identified
Compare Contact With - Contacts
Matching Rule - Custom Contact Matching Rule
Click Save
Click Activate
Once the Salesgenie app has been installed in your environment, please contact your Sales Rep with your Salesforce Org Id so we can fully activate the integration.

