The world of marketing continues to develop, and segmentation is one trend that is seeing an increase in adoption by small businesses that deliver relevant messages to target audiences. In fact, the advantages that market segmentation can offer businesses are incredible.
Salesgenie's Custom Fields allows you the opportunity to search and segment real time Salesgenie records merged with your data to better align your sales and marketing efforts.
Why You Need Salesgenie Custom Fields!
- Ease of use and convenience: Manage ALL listings with blended data in one platform
- Ability to segment data: Allows you to be strategic as you launch different acquisition and retention campaigns
- More Value: Increased ROI
What are Custom Fields
Quite simply, Custom Fields are fields that you can create inside of Salesgenie that will allow you to apply specific values to Salesgenie records. You will be able to create, apply individually or in bulk, search by, and download records with those fields.
Custom Field Types
There are 3 types of Custom Fields: Text, Multi Select, and Dropdown List
Text allows you to input text information as a free form Custom Field.
-Use this field if the value being applied will be unique to each record.
-Example: a customer id number
Multi Select allow you to make one or many selections from a list of one or many values.
-Use this field if more than one value of the same field can be applied to any given record.
-Example: product offerings (security solutions: video surveillance, entry sensor, motion sensor, etc)
Dropdown List allows you to make a single selection from a list of two or more values.
-Use this field if only one of the values can be applied to a record and if that same value can be applied to other records.
-Example: service start date/month (January, February, March, etc)
How to Create Custom Fields
To create Custom Fields, you must first go to the Custom Fields page by clicking on Menu > My Account > Custom Fields: 
The Custom Fields page displays useful information as well as the path to creating additional fields.
-
If you have access to both the US Business and US Consumer databases, a menu will be shown that will allow you to simply switch between databases.
- The menu will not be visible if you do not have access to both databases.
- Name is the name of the Custom Field.
- Type identifies which of the 3 Types (Text, Multi Select, Dropdown List) was used to create the Custom Field.
- Click the Create a Custom Field option to create a new field.
-
Account Level specifies if the Custom Field has been shared to other users on the Account or not (“Yes” is a shared field, “No” is not).
- For information on how to share Custom Fields with other users on your account, please contact your Sales Rep.
- The gear icon gives the option to Edit or Delete the Custom Field.

Click on the Create a Custom Field link (#4 on the image above) to create a Custom Field.
1. A modal will appear asking which database to apply the Custom Field to.
2. Select the database and click the Next button.
-This question will not be asked if you do not have access to both databases.
The next modal will prompt you to name your Custom Field.
1. Enter a name in the Name box.
2. Select a Type and click Save.
Tip- There is a 20 character limit to both the Custom Field name, as well as the Custom Field Value name.

The next modal will prompt you to enter your Custom Field values. (In this example, we will be using the Multi Select and entering in different security solutions. Since this is a Multi Select, one or more of these solutions can be applied to any given Salesgenie record.)
1. Enter all of the values for the Custom Field.
2. Click the Add Another Value link to create additional values.
Tip- There is a 100 Value limit to each Custom Field you create.

3. After clicking Save, the new Custom Field will be shown at the top of the list on the Custom Fields page.
How to Apply Custom Field Values Individually
Custom Field Values can be applied to records to individual records manually, or to bulk records via the import flow.
Manually applying the Values can be done at no additional cost from the results grid.
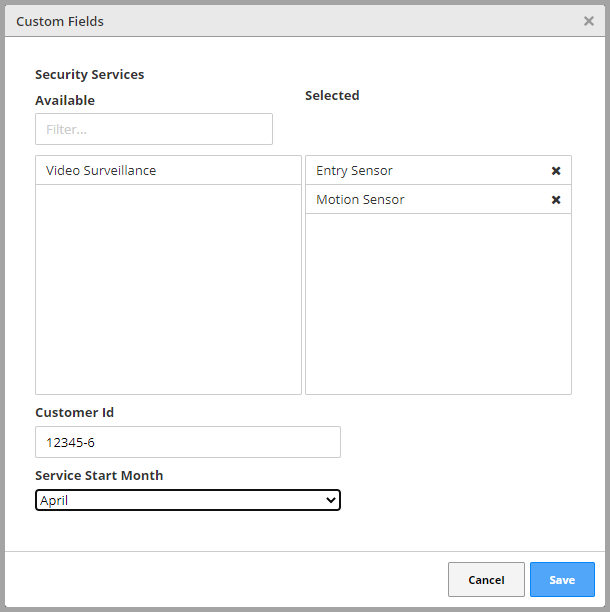
1. Click the + sign next to Custom Fields in the right panel of the record you wish to apply the Value to on the results grid.
2. A modal will appear that lists all Custom Fields available for that database.
3. Apply all relevant Values, then click Save.

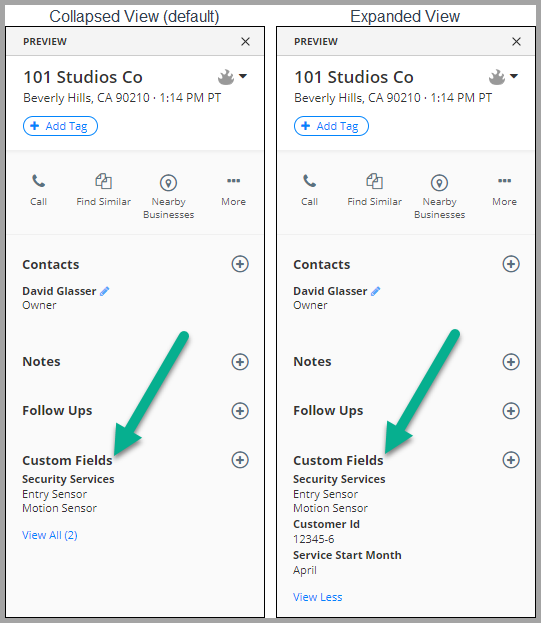
The updated Values will instantly appear in the right panel:
How to Apply Custom Field Values in Bulk
Applying Values in bulk requires the use of Custom Data credits. Please contact your Sales Rep if your don't have enough Custom Data credits to cover your imported file.
Click here for instructions on how to import a list.
Tip: When uploading a file that contains Multi Select Values, make sure all Values are in the same cell and that they are separated by a colon (:), a semicolon (;), a pipe (|), or a comma (,).
How to Search by Custom Fields
All Custom Fields will be listed in their own category in the left hand filters un "<Your Company Name> Data".
Custom Field filters work the same as all other Salesgenie filters.
Each time you select a Custom Field filter, a green pill will be added to the filter bar and your record count will update.

How to Download Custom Fields
All Custom Fields are available to be exported through a download.
1. Click the Export icon at the top of the list on the results grid
2. Name your export
3. Choose your records
4. Select your file format
5. Select the Detailed (Enhanced) Layout, and click Go.